The Digital Bits Science Labs are fun science experiments for young children. Kids, make sure you have an adult's permission before trying any of these science experiments.
Digital Bits Science Lab
Science Experiments for Kids, Parents and Teachers
How to make a pinhole camera. Learn how your eyes work.
Description: A pinhole camera operates on the same principle as the human eye (and a bunch of other eyes, too!) How does a pinhole camera work? How do your eyes see? The answers for both questions are very similar.
Equipment needed:
A shoebox
Black duct tape or black paint
A tape measure
Wax paper
Scissors
A heavy blanket
Rubber bands (optional)
The Digital Bits Science Lab Experiment:
To begin with a picture, here’s the finished pinhole camera:

Granted, this isn’t a true pinhole camera. It’s more of a pinhole viewer, or a pinhole camera without any film. With a small modification, you could convert this viewer into a film-based pinhole camera. But for the purposes of this science lab, this pinhole viewer is more fun to use for smaller children, and effectively demonstrates how the eye works, without bringing in the complexity of film and development.
Take your shoebox and make the inside of the lid and box black. Paint it, or use a wide, black tape. You’ll see that due to running out of tape halfway through, I used both techniques in my shoebox. The black color prevents light from bouncing around inside the box, which would interfere with our pictures.
Put the lid on the box. Tape the top on, or put a rubber band around it – we want it in place for the rest of the setup and usage.
Use the scissors to twist out a small hole in the center of one end. See the photo above for detail – this is a small half-inch hole. Don’t make it any bigger.
Now to the other end of the shoebox: we need to make a viewfinder. It’s just a piece of wax paper taped in place over a two-inch by two-and-a-half-inch-wide square. Cut out the square, then tape the wax paper over it. Try to get the wax paper to be as smooth as possible. Wrinkles or ripples aren’t a big problem, but the more you have the more they’ll interfere with your images.
And that’s it – we’re finished, and our pinhole camera is ready. As you use the camera with the directions below, keep two things in mind:
1) The camera works best when you aim at a brightly-lit object. For example, things under full sunlight, or other things illuminated by a bright light bulb.
2) In order to be able to see the image displayed on the wax paper, you need to block out any ambient light: drape an opaque blanket over your head and the camera. That should keep things dark enough to see the light projected on the viewfinder. The majority of light hitting your eyeballs should be what’s coming out of the pinhole camera.
To use the pinhole camera, you need to point the small hole at one end at whatever you want to view. Hold the camera so it’s about a foot away from your face – you may have to move the camera towards and away from your face until you see an image appear on the wax paper.
As you see the images in the pinhole camera, you’ll see something interesting: the images appear upside down and backward!
Here’s a photo of what I saw during my test:
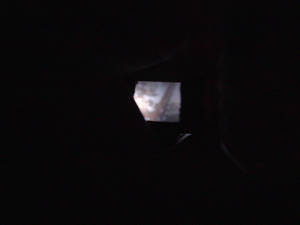
It’s a little small, as it should be – this was my attempt at taking a picture of the wax paper with a digital camera held at viewing distance.
However, see what happens when we zoom in the picture and flip it upside down:

Still doesn’t make much sense? Perhaps not, but here’s a photo of the actual scene the pinhole camera was looking at:
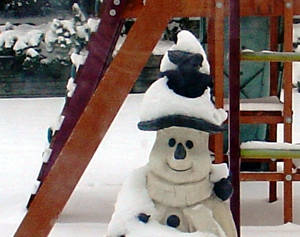
Seeing the original scene, the pinhole camera version should now make sense. It’s blurred from a combination of the camera having no focus, and the wax paper itself messing with the image quality, but it’s still a snowman standing next to a swingset.
What’s happening here?
Light enters the small hole in our pinhole camera. The small hole only allows a little bit of light to enter, and the light that does enter is projected on the wax paper upside down.
A pinhole camera is a great example of how our eye works: the “small hole” in our eye is the iris. Light enters the iris and is projected on to the back of the eye, the retina. The retina is just like the wax paper. Everything you see, including the words you’re reading right now, is projected upside-down on the back of your eye! The brain takes this signal from the retina and flips it “right side up”.
The eye itself is a pretty remarkable organ, but the basics of photography and sight are pretty simple.
Other articles related to this topic:
- Learn about aerodynamics and make your own cheap, simple kites
- Build a balloon-powered mini-hovercraft
- Learn the basics of static electricity and electron transfer
- How to make your own rainbow, and meet “Roy G. Biv”
- Learn about air pressure with a piece of paper
very good experiment. looking forward for another beter experiment
Where you said, “A pinhole camera is a great example of how our eye works: the “small hole” in our eye is the iris. Light enters the iris and is projected on to the back of the eye, the retina”
The small hole in our eye is the pupil. The iris is the muscle surrounding the pupil controlling how much light the pupil lets in.
dude thanx a lot , our physics teacher is expectign to make this on such short ntoice. I didn’t know how wax paper would work out . this helps , yeah he wants us to use wax paper.