The Digital Bits Science Labs are fun science experiments for young children. Kids, make sure you have an adult's permission before trying any of these science experiments.
Digital Bits Science Lab
Science Experiments for Kids, Parents and Teachers
Build a balloon-powered mini-hovercraft
Description:
A hovercraft works because of air pressure: it uses a motor to create a cushion of air. The hovercraft floats on this cushion, allowing it to move over land and water.
Build your own balloon-powered mini-hovercraft. It’s a great way to demonstrate the basics of how a hovercraft works. It also demonstrates the concept of air pressure.
Here’s what we’ll build: our balloon-powered hovercraft, all ready for launch:

Equipment needed:
Balloons
Duct tape
A plastic plate with raised edges. The edges themselves should be smooth if possible, not ridged. (Notice that the plate used in the pictures below has ridged edges. It works, but not as well as one with smooth edges.)
A straw
A sharp knife
The Digital Bits Science Lab Experiment:
Cut a straw in half. Stick the straw into the balloon. Duct tape around where the straw meets the balloon mouth. Test for air-tightness: you should be able to inflate the balloon by blowing into the straw. After you inflate the balloon, pinch the straw closed. If you hear the hiss of air, there’s still a leak – add more duct tape or pinch around the seal to close all leaks.
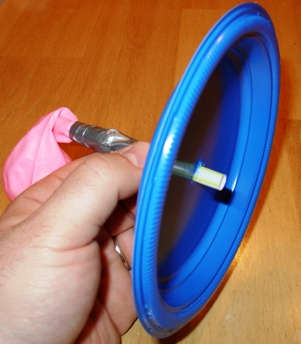
Cut a hole in the middle of the plate. It should be no bigger than the straw.
Turn the plate upside-down. Place the straw/balloon part into the hole in the plate. The straw can extend into the other side of the plate, but shouldn’t be lower than the plate’s edges. (When the plate is sitting upside-down, it should rest evenly on its edges. The straw should NOT be pushing the plate into the air.) Here’s a shot of the bottom of the hovercraft:
Use duct tape to make a seal where the straw enters the plate.
Your final product looks like this:
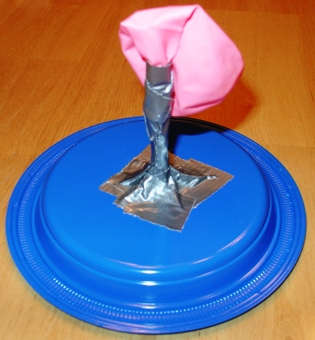
Here’s detail of the bottom of the hovercraft (which is actually the top side of the plate):
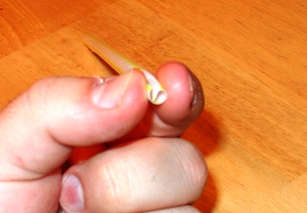
Get another straw. This will be our removable inflater for the balloon.
Crimp the end of the inflater straw. It should look similar to this:
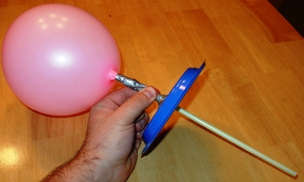
Shove the crimped straw into the balloon-attached straw. If you push firmly, you’ll have a pretty good air seal between the two straws. Blow to inflate the balloon. When you’ve inflated it, you can pinch the straw/balloon part to hold the air in until you’re ready to run the hovercraft.
Here’s a shot of me pinching the hovercraft straw to keep air in the balloon. The inflater straw is still inserted:
Place the hovercraft on a very flat surface, like a table or counter-top, and release the pinch.
The balloon will start pushing air under the plate. The air pressure under the plate will build until the plate floats on a cushion of air. When that happens, the plate will skitter back and forth by itself, until the balloon runs out of air. When the balloon is empty, you can “refill” it again with your inflater straw.
Try different things when you launch the hovercraft: Try spinning it. Try putting it on a hill. Put it in water. Try building hovercrafts with different balloons, and enjoy the results!
Other articles related to this topic:
- Hot air takes up more space than cold air
- Learn the basics of static electricity and electron transfer
- Learn about air pressure from a leaky bottle
- Make some noise – learn about sound with a “straw clarinet”
- How to make a pinhole camera. Learn how your eyes work.
thanx
DBSL é um dos melhores sites com experiências para crianças dos 6 aos 9 anos. É uma pequena que tenha traduções em português de tão má qualidade.
Gostaria de melhorar se for possível.
Anabela Martins
DBSL is one of the best sites with science experiments for kids,
It is a pitty that the portuguese translation is af a very poor quality, in some cases even chenging the scientific explanation and context!!
I would like to help in the translations.
Anabela Martins
Physics teacher
PhD
i like your idea of making a hover craft so much we are going to use your design in our siencefair project
have you tried this out because even though it looks very convincing it may not work and im goin to be racing this thing thursday so i need this thing to work and its gotta carry a piece or chalk
now im not sure about you but that sounds kinda hard but not really so like kinda make sure this thing works okay and it needs to be easy on easy off u know wat i mea???? well thank you for the idea and hopefully it works. truly yours,
Tainted TIff
Tainted Tiff,
Yes, I tried it out when I created this article. The pictures you see in the article are the hovercraft I used.
Unless you get a really big balloon, I don’t think this style of hovercraft has enough thrust to go very far, and it certainly won’t be able to carry much. It’s not steerable, either.
Short story: You should probably take the time to make it yourself *before* you commit to using it in a race of any kind.
this looks very convincing. That gur really needs to shave..no ofense..my huasband is the same way.
I think I’d look scarier with shaved arms!
Yet another reason to get my wife to “model” for these photos.
im comparing your hovercraft vs another one in my science fair
this was not what i was looking for i needed somthing BIGGER
Amanda,
Then scale up the instructions (both in size and material). That should actually be pretty fun to do!
Andy
MY YEAR 9 STUDENTS LOVED THIS ONE…
I CHEATED AND BROUGHT A 30 CM BALLOON BLEW IT UP AND IT WENT AT LEAST 2 METERS…
MY ARMS LOOK LIKE THAT, TIP WEAR LONG SLEEVED SHIRT
nice all you need is to hold the balloon from tippin’
thanks sooo much i was doing this other hovercraft and it didn’t even lift!! Finally my friend gave me this website and its great! thanks again!